

How to Set Up Full Body Tracking on Quest 2 and 3 (2024 Update)

It's been a while since our last deep dive into the world of full body tracking (FBT) for Quest headsets, and boy, have things changed. When we first explored this topic, getting FBT working on a Quest 2 was a complex dance of external trackers, base stations, and careful calibration. While those methods are still viable (and we'll cover them), the landscape has evolved significantly with exciting software developments that now offer built-in tracking capabilities for both Quest 2 and Quest 3 users.
In this updated guide for 2024, we're going to explore both the built-in tracking capabilities now available through Virtual Desktop, as well as the tried-and-true external tracking methods that work for both Quest 2 and Quest 3. Whether you're looking to upgrade your VRChat avatar's expressiveness, dive into more immersive gaming experiences, or experiment with virtual performances, this guide has you covered.
So, strap in (quite literally, in some cases), as we embark on this updated journey to bring your full body into the virtual world. Before we dive into the technical details, let's address some common questions that many users have about full body tracking. These FAQs will give you a quick overview of what to expect and help you decide if FBT is right for you.
Frequently Asked Questions (FAQs)
Q: Can I use full body tracking on Quest 2 or Quest 3 without any additional hardware?
A: Yes, both Quest 2 and Quest 3 now offer a form of body tracking through Virtual Desktop, without needing external trackers. However, for more precise tracking, external hardware is still recommended.
Q: How much does a complete external tracker setup typically cost?
A: Costs can vary widely, but expect to spend anywhere from $300 to $800 for a complete setup, depending on the base stations, brand and number of trackers.

Q: Does full body tracking work with all VR games?
A: No, not all games support FBT. Popular social platforms like VRChat and some specific games support it, but it's not universal. Some of our favorites include Dance Dash, Blade & Sorcery and Beat Saber (with Feet Saber mod). You can find a list of games we recommend and have compiled that support full body tracking here.
Q: How many trackers do I need for a good FBT experience with external trackers?
A: A basic setup uses three trackers (two for feet, one for waist). Some users add more for elbows or knees, but three is typically sufficient for most experiences.
Q: Does full body tracking work with Quest native games?
A: No, full body tracking only works with SteamVR games, not with Quest standalone games. You'll need a gaming PC powerful enough to run SteamVR games and connect your Quest to it using Air Link, Virtual Desktop, Steam Link, or a Link cable.
Now that we've covered some basic questions, let's delve into the exciting world of full body tracking options for your Quest headset.
Built-in Tracking with Virtual Desktop
One of the most exciting developments for Quest users is the introduction of built-in body tracking through Virtual Desktop. This feature offers an accessible entry point into body tracking without additional hardware, though its capabilities vary depending on your Quest model. Let's break down how this works and set realistic expectations.
How It Works
Virtual Desktop offers support for body tracking on Quest headsets, emulating SteamVR Vive trackers. The tracking method differs based on your Quest model:
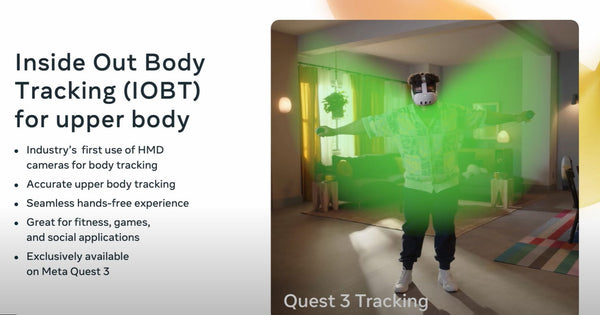
Quest 3:
- Uses the built-in Inside-Out Body Tracking (IOBT) feature, which takes advantage of the headset's downward-facing side cameras for upper body tracking.
- Provides more precise tracking of upper body movements, including elbows and torso.
Quest 2 and Quest Pro:
- Relies on inverse kinematics (IK) for upper body tracking, which is a mathematical estimation method based on head and hand positions.
- Less precise than the Quest 3's IOBT but still offers improved avatar movement.
For all Quest models:
- Lower body tracking uses Meta's Generate Legs feature, which employs AI models to estimate leg positions.
- The system sends this data to SteamVR, which interprets it as if it were coming from actual Vive trackers.
It’s important to note that the tracking is not as precise as physical trackers. For example, if you lift your leg in real life, it can’t actually be lifted (tracked) in VR. However this method is better than having no tracking at all, as it allows your avatar's body to rotate and turn in a more natural-looking way.

It won't work for games that require precise foot tracking, like rhythm games that need input from actual foot trackers, but the main benefit is in social VR applications, where it can make your avatar's movements appear more natural than without any body tracking.
Setting Up Virtual Desktop for FBT:
- Purchase and Install:
- Buy and download Virtual Desktop from the Meta Quest Store onto your Quest (currently $24.99 at the time of this writing).
- Download and install the Virtual Desktop Streamer app on your PC.
- Configure Virtual Desktop Settings:
- Launch Virtual desktop, and open the settings (round button on left Quest controller).
- Navigate to the "Streaming" section.
- Enable the option "Forward tracking data to PC".
- Select "Emulate SteamVR Vive trackers".

- Start VRChat or other FBT-compatible apps through Virtual Desktop.
- Your upper body and estimated leg movements should now be tracked in-game.

This built-in tracking method offers an accessible way to enhance your VR experience, particularly in social VR applications. While it doesn't match the precision of external trackers, it provides a noticeable improvement over having no body tracking at all. For many users, this could be the perfect balance of functionality and convenience, especially for casual use in social VR environments.
In the next section, we'll explore external tracker options for those seeking more precise full body tracking on both Quest 2 and Quest 3.
External Tracker Options
While the Quest 3's built-in tracking is impressive, many users still prefer the precision and reliability of external trackers. These options are available for Quest users who want to achieve high-quality full body tracking. Let's explore the most popular external tracker options:
1. Vive Trackers
- High-quality trackers from HTC, widely supported in VR applications.
- Pros: Excellent tracking precision, widely compatible with VR software, durable and reliable.
- Cons: Expensive (around $129+ per tracker), requires base stations for tracking, needs calibration to work with Quest headsets.
2. Tundra Trackers
- A newer alternative to Vive Trackers, offering similar functionality in a smaller package.
- Pros: Smaller and lighter than Vive Trackers, longer battery life, compatible with SteamVR base stations.
- Cons: Still relatively expensive, require base stations, may have limited availability.
3. AXIS Trackers
- A wireless tracker system that doesn't require base stations.
- Pros: No base stations needed, easy to setup, small size.
- Cons: May experience some drift over time, requires occasional recalibration, body part labeling in the Axis system is a little different from what SteamVR recognizes by default.

4. SlimeVR (DIY or Pre-built)
- An open-source, IMU-based tracking system available as a DIY project or pre-built kit.
- Pros: Most affordable option when built yourself, no base stations required.
- Cons: DIY version requires technical skills to assemble, may experience drift and need frequent recalibration, less precise than optical tracking systems
Some of these systems may require you to use additional (free) software like OpenVR Space Calibrator to make these trackers work with your Quest headset. In the next section, we'll go through the setup process for using external trackers with your Quest 2 or 3.
Setting Up External Trackers
Once you've chosen your external tracker system, it's time to set everything up. This process can be a bit involved, but we'll break it down into manageable steps. This guide focuses primarily on setting up trackers that utilize base stations, so refer to your owner’s manual for setting up other systems.
For full-body tracking in VR while using a Quest headset, you'll need base stations and trackers that are compatible with SteamVR. Here are the key options and recommendations:
Base Station 2.0:
- Widely recommended for full-body tracking due to their precision and compatibility.
- Provide better tracking coverage and are less prone to occlusion issues compared to the 1.0 version.
- Two base stations are generally sufficient, but a third can improve tracking in complex environments.
Base Station 1.0:
- Can be used, especially if you're looking to save costs.
- May not offer the same level of tracking precision as the 2.0 versions.

Hardware Setup
Mount the Base Stations
- Position two base stations in opposite corners of your play area, ideally at a height of 2 meters (6.5 feet) or higher.
- Angle them downwards at about 30-45 degrees to cover your entire play space.
- Ensure they have a clear line of sight to each other and your play area.

Power On
- Connect the base stations to power and turn them on. The status light should be green. If not, check connections and ensure no obstructions.
- Configuring Base Station Channels For Base Station 2.0: Open SteamVR on your PC. Go to Devices > Base Station Settings. Click "Configure Base Station Channels" and follow prompts to set different channels for each base station.
- For Base Station 1.0:Use a pin to manually change channels if needed.
Note: You cannot mix Base Station 1.0 and 2.0 in the same setup.

Pair Your Trackers
If using HTC Vive 1.0 or 2.0 trackers, make sure that you have all the dongles for the trackers plugged into your PC. I recommend using a USB Hub to make sure you have enough space for all the tracker's dongles.
-
- Plug in one dongle into the hub or your computer, and turn on one tracker by pressing the middle button for a second or two.
- In Steam VR, right click on the greyed out tracker and click, pair tracker.

- Click 'I want to pair a different type of controller', and select the tracker.
- Press and hold the middle of your tracker until it starts blinking blue. The light will turn from blue to solid green once its paired.
- On Steam VR, you should see your tracker as a solid blue.

Updating Base Stations and Trackers
It's crucial to keep your base stations and trackers up to date for optimal performance. Here's how to check for and install firmware updates:
For Trackers:
- Connect your tracker directly to your PC using the provided USB cable.
- Open SteamVR settings. Go to the "Devices" tab.
- Click on "Update Device" for the connected tracker. You'll see if your tracker needs an update. If an update is available, follow the prompts to install it.
- Repeat this process for each of your trackers.
- If you're using third-party trackers like Tundra Trackers, check the manufacturer's website for specific update instructions, as the process may differ.
- Base stations typically update automatically when connected to SteamVR.

Labeling Trackers to Body Parts:
- After pairing, you need to assign each tracker to a specific body part in SteamVR:
- In SteamVR, right-click on a paired tracker in the devices list.
- Select "Manage Trackers" from the context menu.
- In the new window, you'll see a list of your connected trackers.
- For each tracker, use the dropdown menu to assign it to the correct body part (e.g., Left Foot, Right Foot, Waist).
- Pro tip: Physically label your trackers (e.g., with stickers) to match their SteamVR assignments for easy future setup.

Calibrating Your Trackers
- Download and install OpenVR Space Calibrator from GitHub.
- Connect your Quest headset to your PC using a Link Cable, Air Link, or Virtual Desktop.
- Launch SteamVR on your PC.
- Open the Space Calibrator app.
- Turn on your trackers and ensure they are recognized in SteamVR.
- Select your Quest controller on the left side and one of your trackers on the right.

- Choose "Slow" calibration for better accuracy.
- Attach the selected tracker to the back of your hand holding the Quest controller.
- Click "Start Calibration" and move your hand in a slow figure-eight pattern for about 30 seconds.

- Once calibration is complete, the tracker should move in sync with your Quest controller.
In-Game Calibration
Launch your chosen application (like VRChat) through SteamVR and look for the full body tracking calibration option in the game's menu. Follow the in-game instructions, which usually involve standing in a T-pose and aligning virtual trackers with your actual tracker positions.
Optimizing and Troubleshooting Full Body Tracking
Setting up and maintaining full body tracking (FBT) can be complex. Here are tips, tricks, and solutions to common issues to help you get the most out of your FBT experience:
-
Inaccurate Tracking
Problem: VR movements don't match real-world movements.
Solutions:
-
Recalibrate using OpenVR Space Calibrator.
-
Ensure well-lit play area, avoiding direct sunlight on trackers.
-
Check for and cover reflective surfaces.
-
Verify clear line of sight between base stations and trackers.
-
Adjust tracker positions on your body.
-
-
Position Drift
Problem: Virtual position drifts from real-world position over time.
Solutions:
-
Perform more frequent calibrations, especially for IMU-based trackers.
-
Check for magnetic interference in the play area.
-
Update tracker firmware if needed.
-
Ensure base stations are securely mounted. Wall mounting your base stations provides the most stable tracking as it avoids potential vibration from the floor.
-
-
Connectivity Issues
Problem: Trackers disconnecting or not being recognized.
Solutions:
-
Check dongle connections or use a powered USB hub.
-
Ensure trackers are fully charged.
-
Restart SteamVR and reconnect devices.
-
Check for Wi-Fi interference with wireless trackers.
-
-
Performance Issues
Problem: Lag or stuttering in VR with FBT. Solutions:
-
Verify PC meets recommended specs for VR with FBT.
-
Close unnecessary background applications.
-
Ensure strong, stable Wi-Fi for wireless solutions.
-
Lower in-game graphics settings to reduce system load.
-
-
Calibration Problems
Problem: Difficulty completing calibration successfully.
Solutions:
-
Follow calibration instructions precisely.
-
Try calibrating in different parts of your play area.
-
Ensure all trackers are on and recognized before calibrating.
-
Verify proper base station positioning and function.
-
-
Avatar Misalignment
Problem: Avatar proportions don't match movements.
Solutions:
-
Adjust avatar proportions in app settings (e.g., VRChat).
-
Ensure correct tracker positioning on your body.
-
Try different avatars, as some may not be fully FBT-compatible.
-
-
Occlusion Issues
Problem: Tracking lost when body parts are occluded.
Solutions:
-
Rearrange play area for better base station coverage.
-
Be mindful of body positioning to avoid blocking trackers.
-
Consider adding trackers for better coverage (e.g., on elbows or knees).
-
-
Base Station Issues
Problem: Base stations not turning on or being detected.
Solution:
- Use phone apps like Lighthouse PM (Android) or BS Companion (iOS) to be able to turn on/off your light houses without having to go through SteamVR.
Conclusion
Full body tracking has come a long way since our original guide, offering more accessible options for Quest 2 users and exciting new built-in capabilities for Quest 3 owners. Whether you're using the Virtual Desktop solution or opting for external trackers on either headset, FBT can significantly enhance your VR experience.
Remember, whichever method you choose, patience and practice are key. Full body tracking opens up new dimensions in VR, from more expressive social interactions to enhanced gaming experiences. As technology continues to evolve, we can expect even more innovations in this space.
We hope this updated guide helps you navigate the exciting world of full body tracking on your Quest headset. Happy tracking, and enjoy your fully embodied virtual adventures!
Atlusblade – You can find base station setup in ‘Setting Up External Trackers’. You do not need a Valve or HTC headset to download and install SteamVR, only the physical base stations themselves and the software (OpenVR Space Calibrator). If you’re having trouble turning your base stations on/off I also recommend downloading the mobile apps Lighthouse PM (Android) or BS Companion (iOS)
This guide doesn’t explain how to setup base stations without a valve/htc headset. I ONLY have a quest 3.